Tomcat概述

1. Tomcat 核心组件

image-20220416104036286

Connector(连接器): 由 端口号 + 协议 组成。

2. 核心组件协作过程
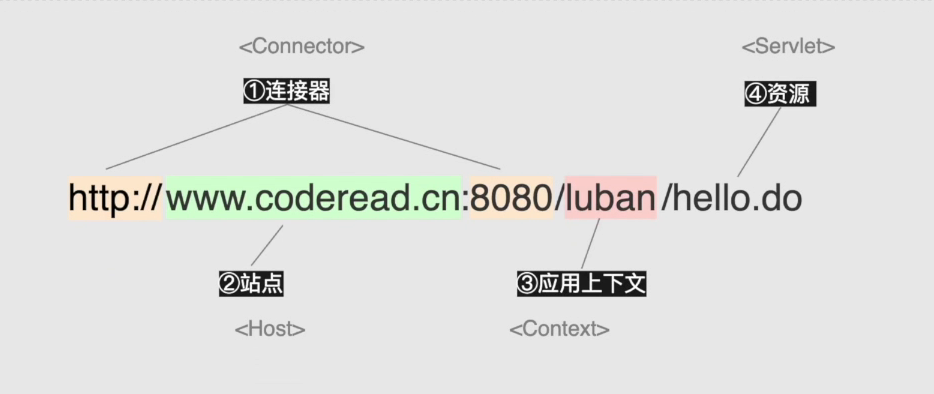
image-20220416104220796

要点:

  1. 连接器可以有多个,不同的连接器可以对应同一个站点
  2. 同一个连接器下,可以有多个站点

即,连接器和站点之间的关系是多对多的。

站点和应用上下文之间是一对多的关系,即一个站点对应该站点下多个应用上下文。站点和资源同样是一对多的关系

3. 源码剖析

3.1 server.xml

image-20220416111749492

Connector(连接器):

  • port:端口
  • protocol:协议

Host(站点):

  • name: 域名
  • appBase:站点对应资源的路径,可配置全路径或者相对路径,相对路径是相对于tomcat的根路径。
  • unpackWARs:是否自动将WAR文件解压
  • autoDeploy:是否自动部署

image-20220416130805986

Context(应用上下文): 在Host对应的appBase目录下的文件夹是隐式的Context, 通过Context标签可以显示的设置Host下的Context

3.2 请求流程分析
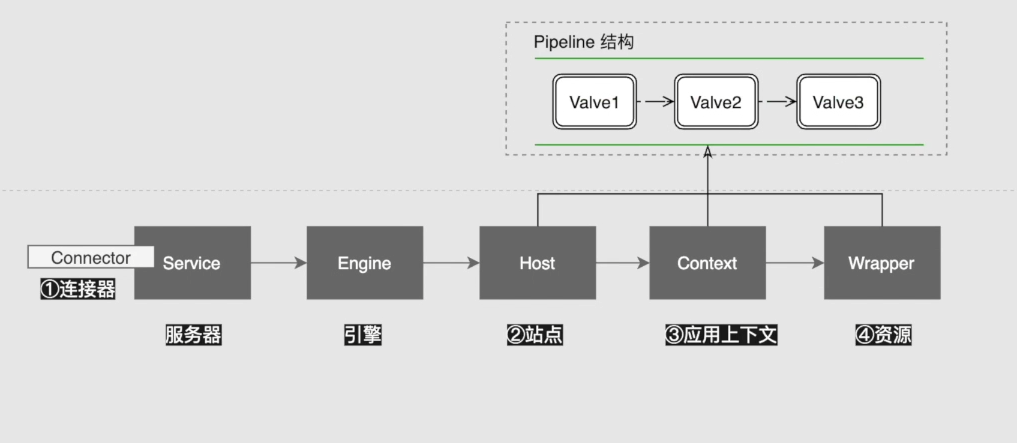
image-20220416131334951

Engine、Host、Context 每一层都有自己的一个pipline结构,里面包含多个Valve
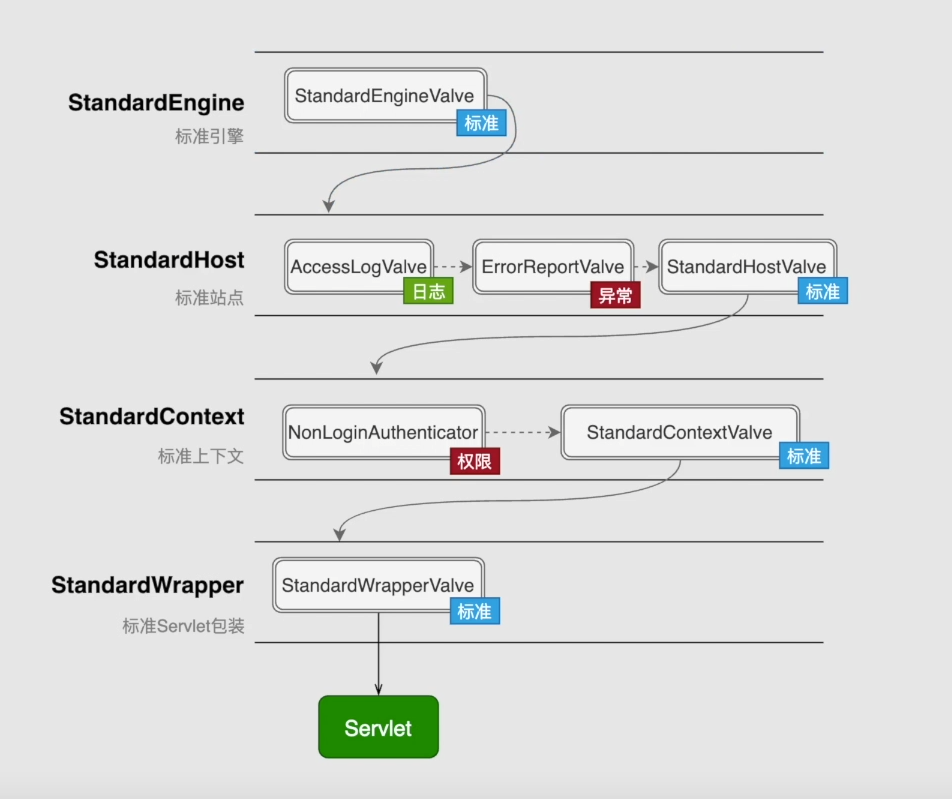
image-20220416131729641

image-20220416134256318

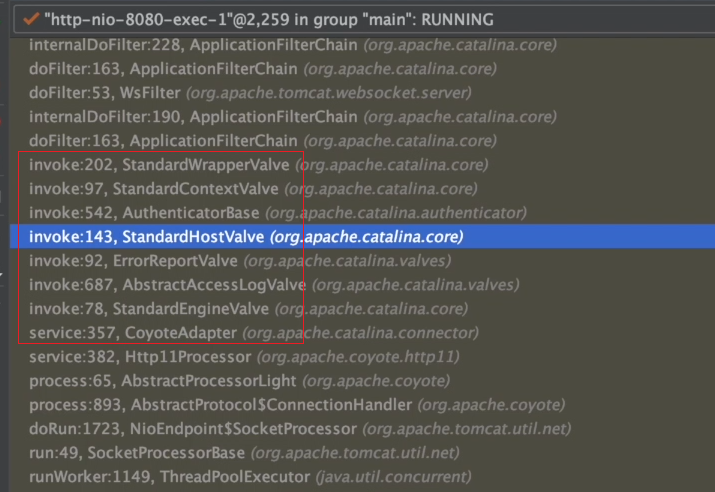
Tomcat 请求处理源码入口为:

1
2
3
4
5
6
7
8
9
10
11
org.apache.catalina.connector.CoyoteAdapter#service() 方法

if (postParseSuccess) {
//check valves if we support async
request.setAsyncSupported(
connector.getService().getContainer().getPipeline().isAsyncSupported());
// Calling the container 根据connector 获取到对应的Service、Container,
// 然后获取到pipline中的第一个Engine,执行invoke方法,默认会有一个标准的StandardEngine
connector.getService().getContainer().getPipeline().getFirst().invoke(
request, response);
}

StandardEngineValve如下所示:

1
2
3
4
5
6
7
8
9
10
11
12
13
14
15
16
17
18
19
20
21
22
23
final class StandardEngineValve extends ValveBase {
public StandardEngineValve() {
super(true);
}

public final void invoke(Request request, Response response) throws IOException, ServletException {
// 根据请求获取对应的host站点
Host host = request.getHost();
if (host == null) {
if (!response.isError()) {
response.sendError(404);
}

} else {
// 判断是否支持异步
if (request.isAsyncSupported()) {
request.setAsyncSupported(host.getPipeline().isAsyncSupported());
}
// 获取到 host 的 pipline 中的第一个 Valve 执行invoke方法,最后会到StandardHostValve
host.getPipeline().getFirst().invoke(request, response);
}
}
}

StandaHostValve中的invoke方法如下所示:

1
2
3
4
5
6
7
8
9
10
11
12
13
14
15
16
17
18
  public final void invoke(Request request, Response response) throws IOException, ServletException {
// 获取host下的context
Context context = request.getContext();
if (context == null) {
if (!response.isError()) {
response.sendError(404);
}

} else {
//....省略一些代码
if (!response.isErrorReportRequired()) {
// context 下的pipline,最后进入StandardContextValve
context.getPipeline().getFirst().invoke(request, response);
}
//....省略一些代码
}
//....省略一些代码
}

StandardContextValve的invoke方法如下:

1
2
3
4
5
6
7
8
9
10
11
12
13
14
15
16
17
18
19
20
21
22
23
24
25
26
 public final void invoke(Request request, Response response) throws IOException, ServletException {
MessageBytes requestPathMB = request.getRequestPathMB();
if (!requestPathMB.startsWithIgnoreCase("/META-INF/", 0) && !requestPathMB.equalsIgnoreCase("/META-INF") && !requestPathMB.startsWithIgnoreCase("/WEB-INF/", 0) && !requestPathMB.equalsIgnoreCase("/WEB-INF")) {
Wrapper wrapper = request.getWrapper();
if (wrapper != null && !wrapper.isUnavailable()) {
try {
response.sendAcknowledgement(ContinueResponseTiming.IMMEDIATELY);
} catch (IOException var6) {
this.container.getLogger().error(sm.getString("standardContextValve.acknowledgeException"), var6);
request.setAttribute("javax.servlet.error.exception", var6);
response.sendError(500);
return;
}

if (request.isAsyncSupported()) {
request.setAsyncSupported(wrapper.getPipeline().isAsyncSupported());
}
// 继续获取pipline中的valve执行,最后进入 StandardWrapperValve
wrapper.getPipeline().getFirst().invoke(request, response);
} else {
response.sendError(404);
}
} else {
response.sendError(404);
}
}

StandardWrapperValve 中invoke方法会在经过FilterChain最后进入Serlvet。

总结:

总的请求处理流程是这样的:

Connector –> Service –> Engine –> Host –> Context –> Wrapper(资源)

从Engine开始到Wrapper中的每一层,都有一个pipline的对象,且都有标准实现,即形成了一个多pipline的结构。

每一个pipline中可以存在多个Valve,默认最后一个是StandardValve,我们添加的Valve都在标准Valve的前面。

执行到Engine时,会获取Engine中的pipline,然后开始依次执行pipline中xxxValve的invoke方法,直到执行到标准Valve,然后再进入下一层的pipline。

4. 线程池配置理论

常用的配置主要有:

1
2
3
4
5
6
7
server:
tomcat:
max-threads: 5 # 最大线程数
min-spare-threads: 2 # 最小线程数,初始化的线程数量
max-connections: 10 # 最大连接数
accept-count: 5 # 等待队列

tomcat线程配置说明:

tomcat启动时会初始化配置指定的最小线程数量的业务线程

当业务线程满了,仍有请求来的话,会创建新的线程来处理请求,直到达到配置的最大线程数

当达到最大线程数,仍有请求进入时,会放到tomcat线程池中的 任务队列 中,此队列能够存储的请求数量为Integer.MAX_VALUE

当队列里存储的请求数 + 最大线程数 达到了配置中的 最大连接数 时,请求会进入accept-count配置的等待队列中

此时内核可以建立TCP连接,但不会在JVM中建立新的连接,当请求数量达到了 等待队列 的上限后,内核也会直接拒绝连接。

综上,tomcat最大连接数是由maxConnection + acceptCount 来决定的。

maxConnection决定能在JVM中建立的最大连接数量。

acceptCount决定在操作系统中能建立的连接数量。

Tomcat建立连接入口

1
2
3
4
5
6
7
8
9
10
org.apache.tomcat.util.net.Acceptor#run()

// ---省略一些代码----
// 此处是检查连接的数量是否达到了最大连接数
this.endpoint.countUpOrAwaitConnection();
// ---省略一些代码----
try {
socket = this.endpoint.serverSocketAccept();
}
// ---省略一些代码----

**org.apache.tomcat.util.net.NioEndpoint#initServerSocket()**方法
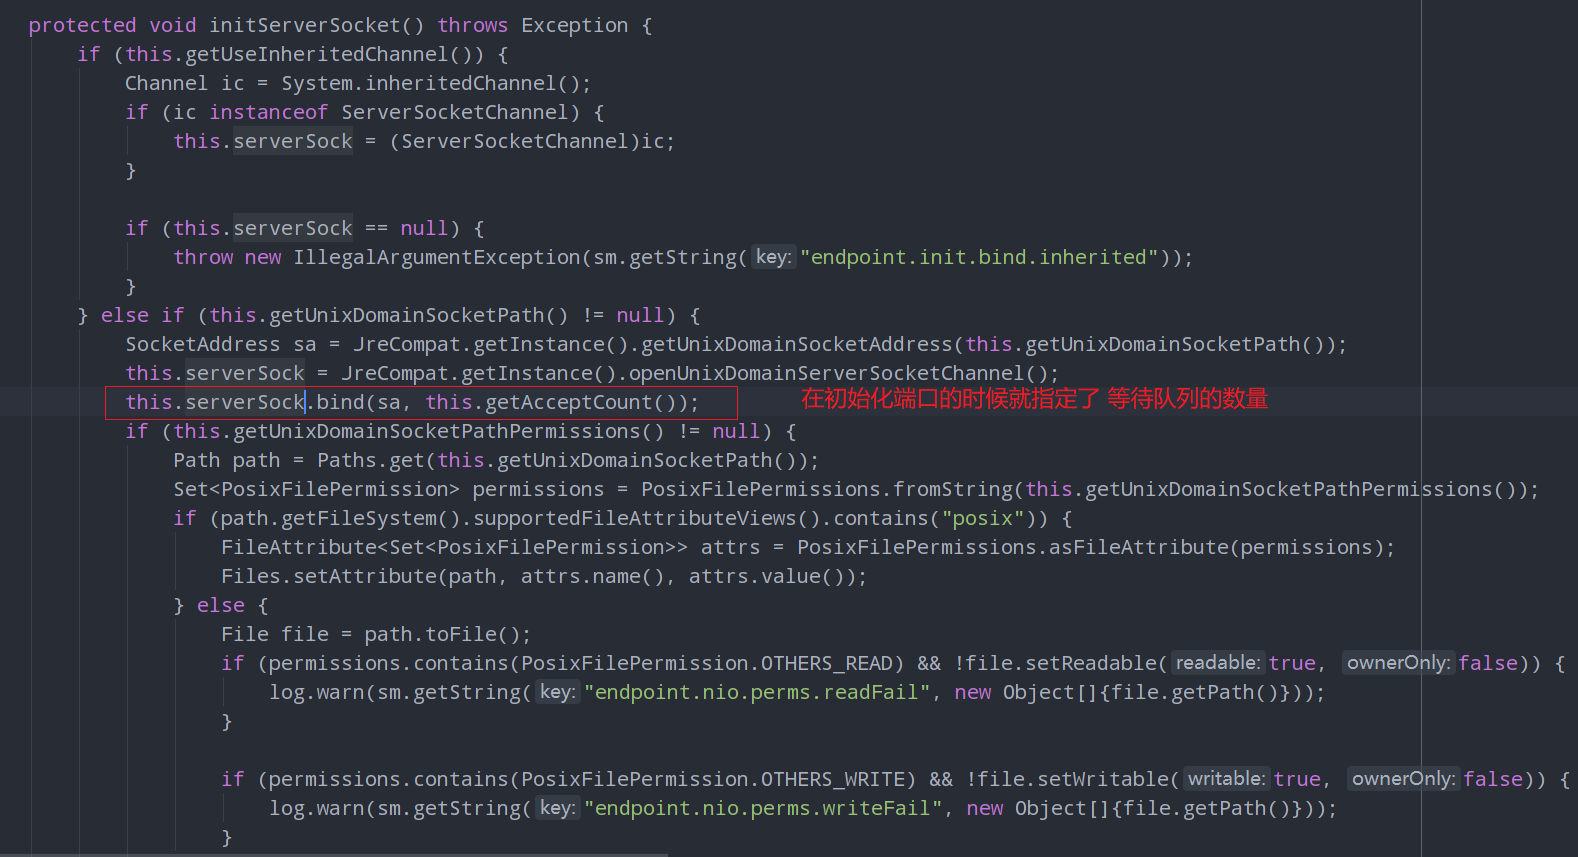
image-20220416144101469